
Arcam AVR10 Overview
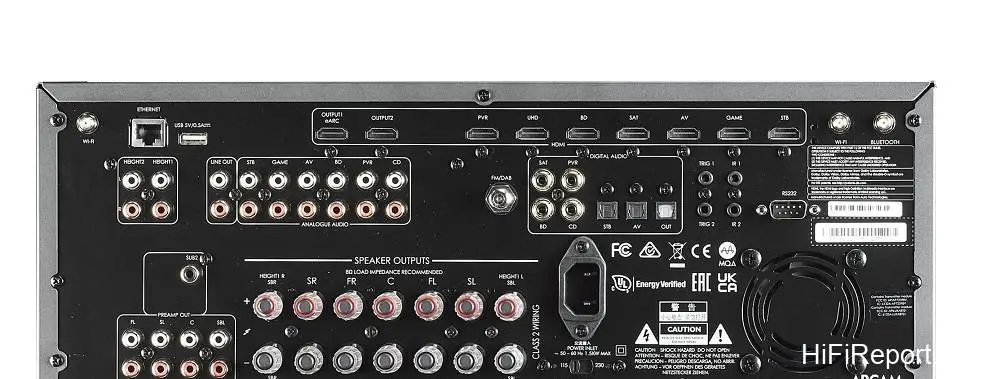
While the AVR10 is Arcam’s entry-level model, in the broader context of the surround sound receiver market, it firmly lands in the high-end category. The primary differences between the AVR10 and Arcam’s flagship AVR models lie only in the number of preamp processing channels and the amplifier circuit type. The AVR10 is a 7.2-channel surround receiver featuring a built-in 7-channel Class AB power amplifier (the .2 LFE channels from the preamp output are paralleled).
The unit itself can simultaneously drive a 5.1.2 (or 5.2.2) speaker configuration. The AVR10’s decoding capabilities extend to 12 channels (7.1.4). If users plan to upgrade their speaker system with more channels in the future, the AVR10 can drive up to 7.2.4 channels simultaneously when connected to an external 4-channel power amplifier.
The AVR10 comes equipped with Wi-Fi and Bluetooth. When connected to a network, it supports Apple AirPlay 2 and Google Chromecast, and can play music files shared from music servers, computers, and portable devices via UPnP. The AVR10 also supports MQA decoding and is Roon Ready certified.
The rear panel of the AVR10 features 7 inputs and 2 outputs for HDMI terminals, all compatible with 4K video (HDMI 2.0b). It supports eARC digital audio return, compatible with modern smart TVs. Thus, when playing Disney+ or Netflix content on a 4K TV, as long as the setup is correct and the streamed content includes Dolby Atmos, the AVR10 can decode it properly. In addition to Dolby Atmos, the AVR10 also supports Auro-3D, DTS:X, and IMAX Enhanced.
Dirac Live Technology
A major highlight of the AVR10 is its digital room correction capabilities. Arcam has been one of the pioneering companies globally to implement Dirac Live technology in surround sound receivers. Dirac Live’s functionality and upgrade options vary across different manufacturers and models. Users are generally aware of the difference between the Dirac Live Full Frequency version (correcting the entire frequency range) and the Limited Frequency version (correcting frequencies below 500Hz).
Based on my hands-on experience, I can confirm that the AVR10 includes the Full Frequency version right out of the box, with no need for a paid upgrade.
Calibration Tools and Manual Setup
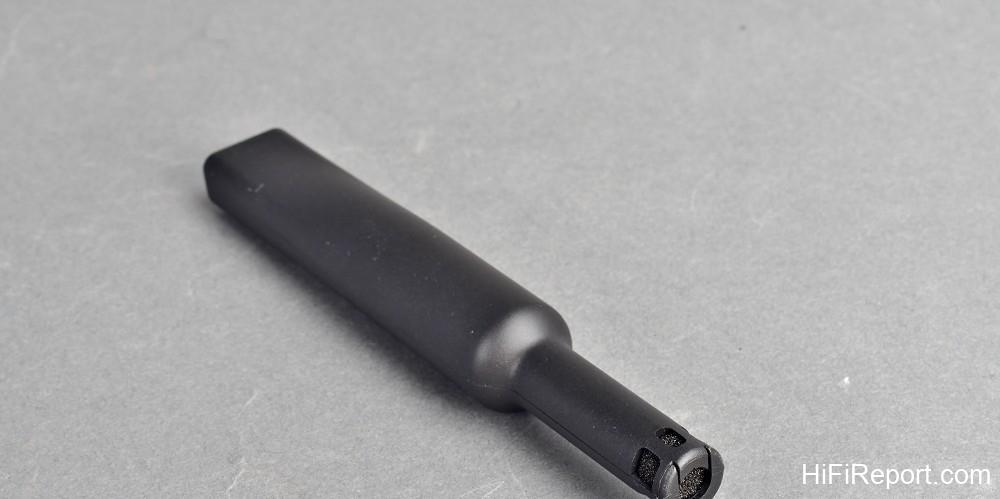
Precise measurement is the foundation of effective room correction. The Arcam AVR10 not only includes a test microphone but also provides access to calibration files and target curves. As shown in the image above, on the product page of Arcam’s official website, you can download a compressed file containing the “Arcam Mic Calibration & Target Files”.
After downloading and extracting the files, during the initial setup phase of the Dirac Live 3 test procedure, after selecting the test microphone, you should immediately import the calibration file “AVRMicCal.txt” located in the MicCalFile folder. This ensures the accuracy of the frequency response measurements.
Incidentally, since the AVR10 comes with a test microphone and its calibration file, users who want to “level up” their skills can download and install REW (Room EQ Wizard), add this test microphone, and import the calibration file. This effectively gives you a highly reliable audio spectrum analyzer, allowing you to take control of system optimization.
You can judge the soundstage and imaging of your speaker placement (including active subwoofers) by ear, and use REW to objectively assess the frequency response balance.
My purpose in discussing this is to encourage users to experience the AVR10’s best performance in terms of sound “quality”. While various room correction technologies exist today, multichannel products performing any digital audio processing (with rare exceptions among surround sound preamps) will inevitably lose some degree of sound quality and dynamic range.
This is why some models feature a “Pure Direct” mode that bypasses digital audio processing, allowing users to enjoy higher sound quality when listening to music.
The AVR10 does not have a dedicated “Pure Direct” mode, but setting it to “Room EQ Off” (which disables all Dirac Live corrections) is roughly equivalent to the Pure Direct state. To use it this way, you should first approach setup as if building a two-channel system, carefully adjusting the placement of the left/right speakers and the subwoofer. Listening to music in 2-channel or 2.1-channel configurations will be perfectly fine.
Next, proceed with the AVR10’s manual setup: go into the menu to input the presence and size of all speakers, set the subwoofer crossover points, measure the distance from each speaker to the listening position using a laser distance meter, and use REW with the test microphone as an SPL meter to adjust the sound pressure of each channel sequentially until they are consistent.
Of course, this manual setup process can be skipped (it doesn’t matter for those who don’t want to bother or aren’t particular). I will now discuss the Dirac Live calibration procedure and operating techniques.
Listening Impressions
For this review, I paired the AVR10 with Pioneer EX series speakers (5 channels), Monitor Audio upward-firing speakers, and an M&K X10 subwoofer (totaling 5.1.2 channels). I began by listening to music files in a 2.1-channel configuration (left/right speakers and subwoofer crossover set at 40Hz). I first listened with “Room EQ Off,” relying purely on my manual adjustments without any Dirac correction.
Despite Arcam being a venerable British brand, the AVR10 exhibited a sound character that was surprisingly young, crisp, transparent, direct, and highly resolving. The soundstage was very present, leaning towards a “realistic” portrayal. As I mentioned earlier, when the AVR10 is not using Dirac Live correction, it is akin to a Japanese surround receiver in “Pure Direct” mode.
The timbre of instruments like the violin and the texture of the bow on the strings were delicate (compared to when equalization was applied). Reverb in the performance space and fading echoes were conveyed more clearly. The impact of piano keystrokes and the bounce of beats in pop music were also stronger. At this point, you might wonder: why bother with room correction then?
Achieving good sound without room correction requires not only honed tuning skills but also excellent speakers and optimal room acoustics. Most home environments cannot replicate dedicated listening spaces like ours, which are specifically calculated and feature substantial acoustic treatment. Therefore, even if a user possesses ample skill, knowing the problem doesn’t always mean being able to solve it.
This is where room correction steps in, overcoming negative influences from the room and human factors.
I then listened to the result of my first Dirac Live “automatic setup” for the unit. Using the current version of Dirac Live 3 for the test setup without any additional adjustments, I found the AVR10’s sound at this point to be neutral and analytical. It effectively eliminated room modes that caused low-frequency standing waves, resulting in cleaner and faster bass.
It also appropriately compensated for the high-frequency roll-off caused by off-axis tweeter response, bringing out more detail and sparkle in the upper treble. However, subjectively, I felt that this method of adjusting the frequency response to be very flat, especially in “flattening” the low-frequency standing waves, might leave more experienced audiophiles feeling the bass lacked some weight and the overall sound was a bit dry.
Compared to the previous setting, the second Room EQ I configured using the Harman Target Curve resulted in sound that felt richer, more nuanced, and softer. Users will immediately understand why the Harman Target is so highly regarded in the audio industry – this is the response state that allows most audiophiles to comfortably enjoy music. It offers a slightly full bass presence, a thick midrange and mid-bass, and smooth, slightly sweet treble that doesn’t feel dull.
This is one of the benefits of using Dirac Live: if you know what the Harman curve looks like, you can truly make your audio system’s actual response approach the Harman curve.
As for the third Room EQ I set using “Harman_Full Range+3dB_under_80Hz,” it’s excellent for exaggerating the subwoofer energy in movie soundtracks. It’s also suitable for compensating for bass loudness when listening to music at low volumes late at night. After comparing, I used this specific Room EQ setting for movie soundtracks. Explosions, impacts, and musical scores had stronger low-frequency impact.
With the AVR10’s hardware quality combined with Dirac Live calibration, even with a basic 5.1.2 speaker configuration, you can already perceive a high accumulation of sound information creating a three-dimensional soundfield. Outdoor scenes in various movies felt expansive and very deep. Dirac Live’s precise calibration aligns the timbre and timing of each channel’s speakers, resulting in a strong sense of image solidity in the sound effects.
Not only are sound objects clearly moving in space, but users can also perceive a sense of objects “flying out of the screen” and approaching the listener at close range.
Conclusion
Is the Arcam AVR10 worth buying? From an objective standpoint, the AVR10’s digital audio processing and digital-to-analog conversion circuits are comparable to those in Arcam’s flagship models. It has fewer power amplifier channels than some products in a similar price range, but this results in stronger “actual” speaker driving capability and stable performance at high output levels.
I quite appreciate this design choice by Arcam; instead of squeezing in too many power amplifier channels with inevitably weaker drive, it’s better to have fewer channels but ensure they can properly drive the speakers. Dirac Live enables the AVR10 to perform exceptionally well for both music and movies, and it offers both “automatic” and “manual” capabilities. The ability to customize target curves fully satisfies experienced users who want to “deep tune” and create their own sound style.
Considering performance, sound quality, features, and price, I believe the Arcam AVR10 is well worth the purchase.
Specifications
* Type: Class AB Surround Receiver
* Decoding Channels: Dolby Atmos and DTS:X 7.1.4 channels
* Power Amplifier Channels: 7 channels
* Two-channel Power Output (THD less than 0.2%): 85 watts per channel (8 ohms), 100 watts (4 ohms)
* Maximum Simultaneous Output Power (7 channels driven, THD less than 0.2%): 60 watts per channel (8 ohms), 85 watts (4 ohms)
* Signal-to-Noise Ratio: 110 dB
* Frequency Response: 20Hz ~ 20kHz (±0.2 dB)
* HDMI Terminals: 7 in, 2 out
* Dimensions (W×H×D): 433×171×425 mm
* Weight: 16.5 kg