
Telos GNR 3.1 Active Grounding Noise Reducer Review
I’m very familiar with Telos’s GNR active grounding boxes.
I reviewed the original GNR V1.0 when it was released in 2016. Earlier this year, when the GNR was upgraded to V3.1 and the 3.1 Mini was launched, I also introduced this entry-level grounding box, suitable for smaller systems, through a review.
Through extensive personal use, I know very well the capabilities of the GNR and its astounding improvements.
However, there was one aspect I had never experienced: Telos’s in-home tuning and installation service, specifically for GNR 3.1 users, provided by Mr. Lin himself. This service encompasses phase, polarity, and directionality checks, along with the meticulous installation of the GNR. According to Mr. Lin, this complete service has even been experienced by several prominent reviewers in the US and Japan, all of whom have given it high praise. Naturally, I wanted to experience it too.
Taking advantage of the GNR 3.1 review unit, I persuaded him to come to my house for the installation and some tuning, to see if it was truly as amazing as described.
After this experience, I can only say that I have a completely new understanding of audio.
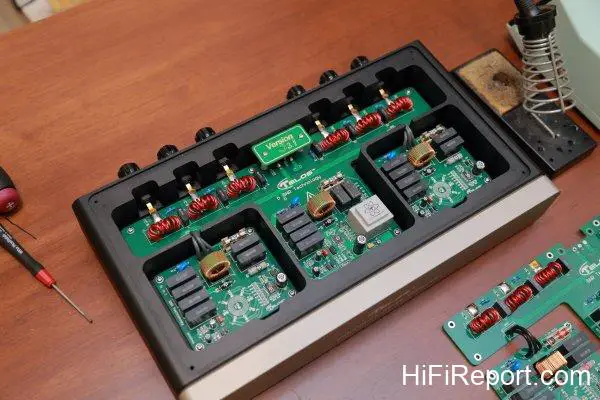
The Telos GNR 3.1 active grounding box utilizes Telos V3.1 component selection technology and incorporates two QNR (Quantum Noise Resonator) modules, effectively combining grounding and power purification in one unit.
Objective Adjustment Methods
This entire service package developed by Mr. Lin is exclusive to GNR buyers.
You might think that this is just a free tuning service bundled with the GNR, and therefore optional. You’d be wrong! Mr. Lin’s tuning is no mere afterthought. This entire service is the culmination of Mr. Lin’s many years of direct interaction with end consumers, coupled with the directionality principles of components derived from his V3.1 technology development. It’s an objective adjustment method based on fundamental electrical principles and scientific logic, rather than subjective tuning.
After the adjustments and the installation of the GNR 3.1, the astonishing benefits of active grounding are even more apparent.
Mr. Lin told me, “To get good sound, you must first address three things: phase, polarity, and directionality.” Therefore, he first checks and adjusts these three aspects before installing the GNR 3.1.

Phase here refers to the positive/negative phase of the signal, including whether the pin configuration of the balanced cables is correct and whether the positive and negative terminals of the speaker cables are connected correctly.
Polarity refers to the correct polarity of the power line’s hot and neutral wires. This includes wall outlets, equipment transformers, and power cords. With so many outlets and power cords used in a stereo system, it’s hard to guarantee that all polarities are correct. Mr. Lin used a multimeter to measure each one for me, making immediate adjustments where possible.
It was discovered that the transformer polarity of one of the components was reversed. The solution? Temporarily reverse the power cord plug of that component.
Phase and power polarity have no gray area; they are either correct or incorrect and can be checked with a multimeter. However, the directionality of cables cannot be measured with a meter; it can only be determined by listening. Therefore, the subsequent directionality judgment relies solely on “hearing is believing.”
What to listen for? Mr. Lin provided a simple method: judging the “soundstage perspective.”
Everyone can try this at home.
This time, Mr. Lin personally demonstrated Telos’s standardized tuning service and GNR 3.1 installation at my home.
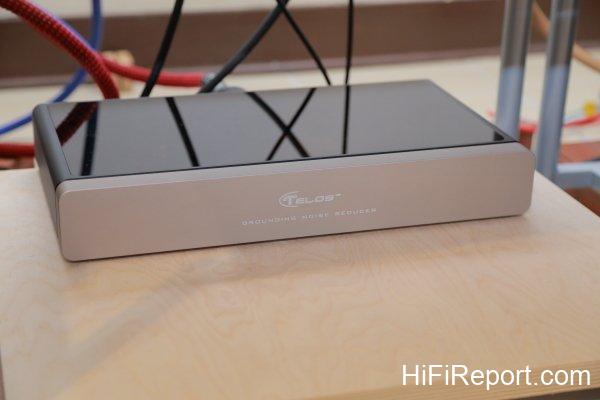
The picture above shows the actual installation of the GNR 3.1 on my audio rack.
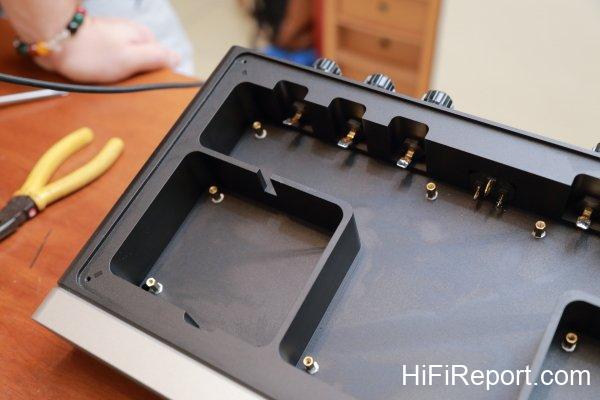
It must be said that the metalworking quality of the chassis is absolutely top-notch.
Using Soundstage Perspective to Check Cable Directionality
According to Mr. Lin, under ideal conditions, the soundstage projected from the speakers should be like a flat image, with equal width at the top and bottom, and with focused and clear imaging. Different vocal parts or instruments should have clear positions, and the soundstage should never be top-heavy or bottom-heavy. However, if the soundstage perspective is like looking up (wider at the top, narrower at the bottom, with a weak lower register) or looking down (narrower at the top, wider at the bottom, with insufficient height), it indicates that the directionality of some cables needs adjustment.

I then played some music and asked Mr. Lin for his “advice.” He immediately pointed out that my system had bass, and quite a bit of it, but it was hollow. Therefore, the soundstage’s center of gravity seemed to be in the upper part, floating upwards, “like an inverted Mount Fuji,” and he added that the “soundstage perspective was looking upwards.”
So he suggested that I first reverse the direction of the HDMI cable between the Audiobyte Hydra Z DDC and the Black Dragon DAC.
With this change, the lower register began to solidify, and the imaging became more focused. The bass began to have a downward trajectory, and the soundstage had a sense of grounding.
The image changed from an upward perspective to a flat perspective. The image structure gradually formed, and the soundstage extended backward, with a clearer depth.
Simply put, the soundstage shape became correct!
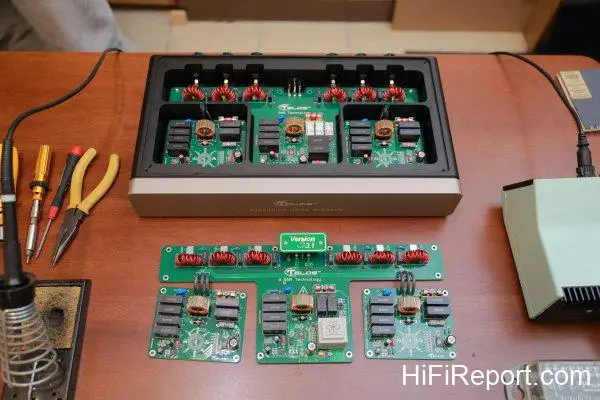
I already had an original GNR, so this time Mr. Lin brought the 3.1 version GNR circuit board to upgrade it on the spot.
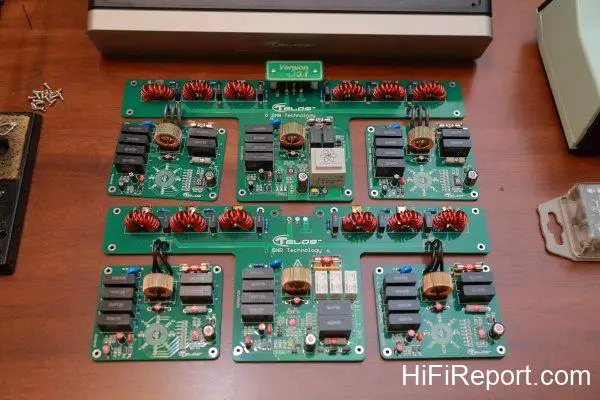
The top photo shows the early GNR 1.0, and the bottom shows the GNR 3.1 circuit board.
This wasn’t enough. Mr. Lin suggested I also reverse the direction of the DC power cable for the network switch (I had already switched to a KECES P8 linear power supply, so the DC cable could be reversed).
After listening to the change, he asked me to reverse the direction of the network cable between the NAS and the switch as well.
After listening again, the soundstage layering became clearer, the bass became more controlled and focused, and the relative proportions of different vocal parts became increasingly defined.
In an instant, the problem I had always had with loose and diffuse bass, which I originally thought was due to standing waves, was easily solved. I thought to myself, without replacing or adding anything, just by adjusting the cables, the sound had already improved significantly. How could this be?
Seeing my surprised expression, Mr. Lin explained, “The improvement achieved by ‘getting the directionality of the cables right’ cannot be obtained by adjusting speaker placement, treating the room, or upgrading equipment.”
This is what he discovered while researching V3.1 technology: cables, like non-polarized capacitors, also have a current directionality. If used in the correct direction, the sound will change for the better.
Things like RCA cables, network cables, HDMI cables, and even fuses can be reversed. You can adjust the direction yourself without any cost; you just need the patience and time to compare and verify. Everyone can try it.
The sound had already greatly improved at this point, but this was just the prelude to the GNR 3.1 installation.
Mr. Lin told me that the purpose of tuning first is to build a solid foundation, returning the audio system to its baseline and restoring its inherent character. Then, installing the GNR 3.1 active grounding box will bring even greater improvements.
It’s like calibrating a projector: when the correct color and contrast are restored, the true performance of the projector can be revealed.
Old Users Can Also Enjoy New Technology
Next came the main event: installing the GNR 3.1.
I already had a V1.0 GNR. The CNC-machined one-piece chassis of the V1.0 and V3.1 remained unchanged, so Mr. Lin only brought the V3.1 circuit board for an on-the-spot upgrade.
The biggest change in the GNR 3.1 is the application of Telos V3.1 component selection technology. For details on this technology, refer to the article “Playing with Audio, Starting from Scratch – Telos GNR 3.1 Mini Active Grounding Box / GNR 3.1 Quantum Noise Resonator,” which won’t be repeated here. The key point is that old users of the GNR V1.0 and V2.0 can also enjoy Telos’s continuously improving R&D results through a paid upgrade.
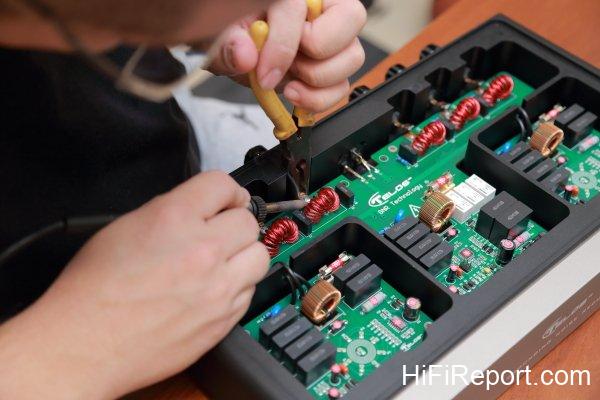
First, the old circuit board needs to be desoldered and removed.
The old circuit board has been removed, and it’s placed next to the new 3.1 version for a photo.
The circuits are largely the same, as the difference lies in the selected components, not the circuit itself.
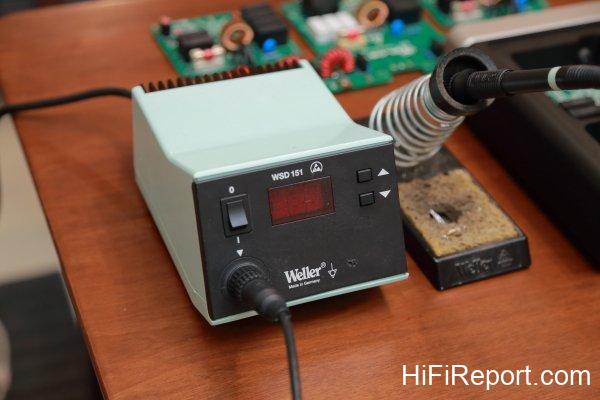
This is the temperature-controlled soldering iron that Mr. Lin brought. He said that this is the Mercedes-Benz of soldering irons, a model of very high quality.
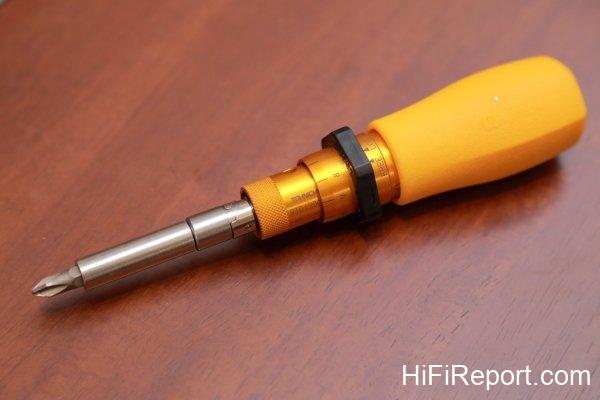
Mr. Lin took out the temperature-controlled soldering iron, solder, and torque screwdriver and immediately got to work. It only took him about twenty minutes to complete the upgrade.
This is because the GNR 3.1 has a modular design, with the entire circuit consisting of only three circuit boards. The jumpers have already been soldered and tested at the factory. During the replacement at my house, only 6 output points and 3 AC socket connections needed to be desoldered and resoldered. Plus, Mr. Lin has already converted many units, so it was done in a flash.
What about the torque screwdriver? When the circuit board is screwed onto the chassis, each screw must be tightened to the same degree. These are all part of Mr. Lin’s standard operating procedures.
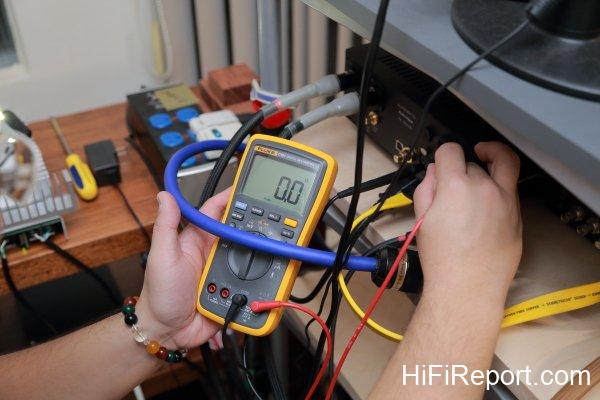
The function of the GNR 3.1 is active grounding. Its grounding impedance is more than forty times lower than the power ground’s impedance. The noise from the equipment will preferentially enter the GNR, where it is eliminated by the built-in two QNR quantum noise reduction circuits. However, before connecting the GNR, it’s necessary to find the optimal connection point on the equipment, which is the position with the lowest impedance to ground.
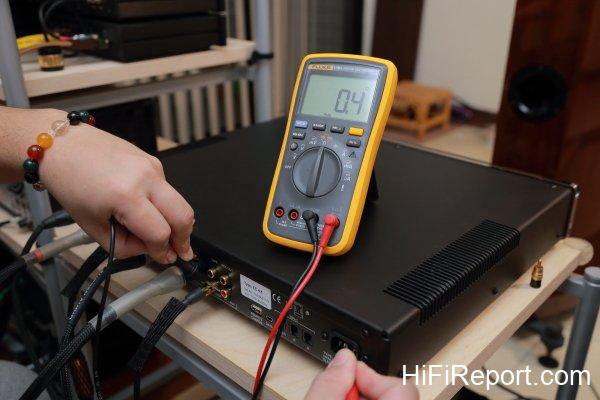
Mr. Lin will use a multimeter to measure this for you, so don’t worry about not knowing how to operate it.
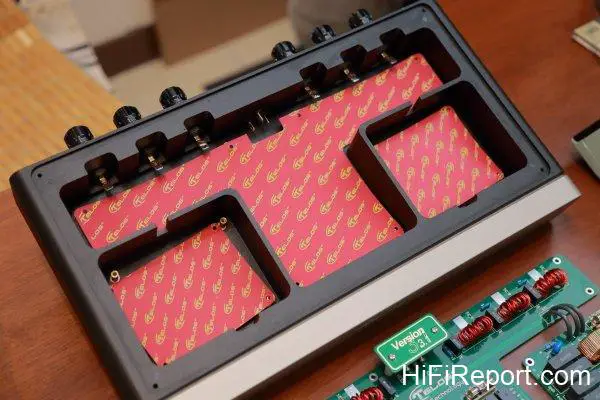
The GNR’s chassis is made of a single piece of aluminum alloy CNC-machined in one piece. The chassis itself has a very low impedance, and its vibration suppression effect is much better than that of ordinary aluminum extrusion chassis.
The red Telos-branded soft pad is an insulation pad under the circuit board. It is made of silicone mixed with far-infrared materials, which has the effect of activating energy.
A Noticeable Leap
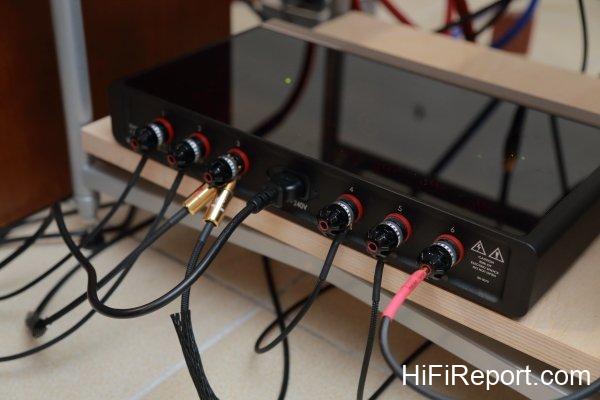
The GNR 3.1 has 6 output terminals on the back, labeled 1 to 6. Noise from 1 to 3 is processed by one QNR quantum noise reduction module, while 4 to 6 are handled by another QNR.
The GNR 3.1 can ground 6 devices simultaneously, which should be more than enough for most users.
There are two simple principles to follow when allocating the 6 outputs.
First, separate analog and digital equipment. For example, connect the preamplifier, power amplifier, or integrated amplifier to 1 to 3, and the DAC, streaming player, computer, or NAS to 4 to 6.
Second, connect devices with higher power consumption to the lower numbered positions. For example, connect the power amplifier to 1, the preamplifier to 3, the computer to 4, the DAC to 6… and so on.
My connection is as follows: 1 and 2 are connected to a pair of NuPrime Evolution 1 monoblock power amplifiers, 3 is connected to the EC 4.8 preamplifier, 4 is connected to a Win 10 desktop computer, 5 is connected to a QNAP NAS, and 6 is connected to an Audiobyte Black Dragon DAC. I used all 6 outputs, none were wasted.
Finally, the moment of truth. How does it sound? Even though I had already heard the comparison between the GNR 3.1 Mini and the GNR 2.1 (refer to “Beating the Big Brother – Telos GNR 3.1 Mini First Look”), and I knew that the GNR 3.1 Mini, utilizing V3.1 technology, was a noticeable leap from the previous GNR 2.1, I was still amazed and excited when the GNR 3.1 was first turned on: my system had reached a new, unprecedented height! In short, the effect of the GNR is to enhance all the details, making the sound more realistic and natural, and making the soundstage and imaging clearer. The GNR 3.1 is a big step forward in this direction.
The torque screwdriver used to tighten the circuit board screws.
Each screw must be tightened with a fixed torque.
Then, the new circuit board is installed, and the terminals are soldered.
It only took about twenty minutes to complete the modification. Thanks to the GNR’s modular circuit board, the installation was very quick.
The old circuit board is in the lower right corner.
I played the familiar “Tutti!” I could listen at a higher volume than before, with full-bodied sound and more powerful energy, yet it sounded more comfortable and relaxed.
I also felt that the soundstage not only went further back, becoming deeper, but also became wider and more spacious. The different vocal parts were also more focused, making the shapes smaller and more precise, The image and the layering also has improve.
Not only that, but the texture of the sound was also improved. The brass instruments had better density, a brighter and more beautiful luster, and a more delicate and softer texture. The strings also became smoother and more flowing. More importantly, the overall thickness was even better than before, and the sound was fuller.
For example, in Trevor Pinnock conducting The English Concert’s performance of Bach’s violin concertos, the separation between the solo violin and different string sections was more pronounced with the GNR 3.1. The relationship between the sections, both front-to-back and side-to-side, was clearer and tighter. Moreover, the timbre was not only more gorgeous and luxurious, but the differentiation of the timbres of different instruments was also clearer.
Another example is Keith Jarrett’s “Book of Ways, Clavichord” album. The originally very crisp sound of the strings had a bit more warmth, indicating that the midrange details were richer than before.
The reason for this significant change is that the GNR 3.1 further reduces the grounding impedance, resulting in less “character” in the sound and making the details more apparent. Therefore, the timbre is richer, more realistic, and more natural.
Before installing the GNR 3.1, it’s necessary to find the position on the equipment with the lowest grounding impedance, and then connect to the GNR 3.1 from this position.
The picture shows measuring the terminals and screws of the EC 4.8 preamplifier. The position with the lowest impedance was found to be the RCA input terminal.
Next, the grounding impedance of the NuPrime Evolution 1 power amplifier is measured.
The Evolution 1 already has a grounding terminal on the back. After measurement, the impedance of this terminal was 0.4 ohms, which is lower than the 0.8 ohms of the RCA input terminal. Therefore, the grounding terminal can be used directly.
Next, we need to find the grounding point of the Black Dragon.
The grounding impedance of its AES input socket was actually 0, indicating that it is directly shorted to ground. Therefore, it can be connected to the AES input socket.
Even Faint Bass Becomes Very Clear
The GNR 3.1 brought me so many surprises on the day of installation. As the run-in days increased and the machine gradually matured, I began to play some songs that I often listened to in the past, and I got more and more surprises.
For example, I have listened to Clair Marlo’s “Let It Go” album, track 1 “‘Til They Take My Heart Away” countless times. It was the first time I could clearly distinguish between the kick drum and the bass.
In this recording, the kick drum is a short, percussive sound, while the bass has a longer sustain. In the past, the kick drum was always masked by the bass sustain, making it difficult to hear the short “thump.” Now it’s different; the two sounds are clearly distinguishable, with no confusion.
Another example is the soundtrack of the movie “True Grit.” There are many songs in it that feature the piano.
In the past, listening to these songs, I thought the piano sounded pretty good. After switching to the GNR 3.1 and listening again, I realized that the previous sound was like an electric piano, lacking texture and sounding quite monotonous. Now, the timbre has become much richer and more realistic. Moreover, when multiple keys are pressed simultaneously, the distinction between each note is clearer.
In addition, the bass trajectory in the softer passages is also clearly presented. The bass is both light and steady, making many of the quiet scenes that set the plot and explain the motives more atmospheric.
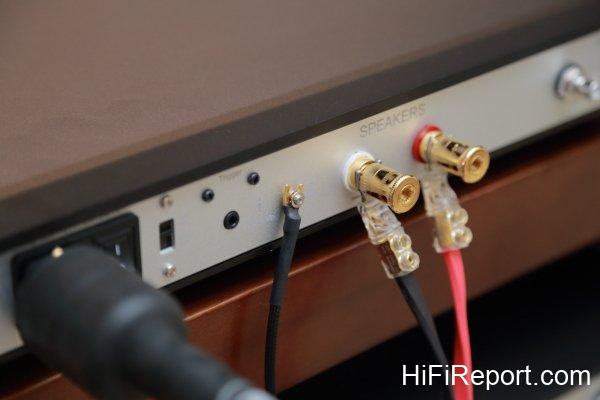
The GNR 3.1 has 6 outputs on the back. The lower the number, the more suitable it is for connecting devices with higher power consumption.
My NuPrime Evolution 1 monoblock power amplifiers are connected to 1 and 2, and 6 is connected to the Black Dragon DAC.
The two gold plugs connected to 3 are connected to the EC 4.8 preamplifier.
Because the EC 4.8 is a dual-mono model, I use two cables for grounding.
The GNR 3.1 also makes extremely faint bass very clear. For example, in Karajan’s selection of slow symphonic movements, there are some very slow and soothing passages with a gentle pizzicato from the double bass, a “thump” sound that is both light and clear in its percussiveness, and is never overwhelmed by the bass lines.
I couldn’t help but think that if you wanted to achieve such an improvement simply by upgrading equipment, the cost would probably be staggering, and you might even spend the money without any effect. However, Mr. Lin’s tuning and the GNR 3.1 improve the system from its depths, and the results are incomparable.
Bass is a decisive factor in the quality of an audio system. The GNR 3.1’s improvement in this area is effortless. For example, when playing the soundtrack of the movie “The Da Vinci Code,” which features Hans Zimmer’s signature bass layering technique, the massive and complex bass becomes organized with the help of the GNR 3.1, unlike in the past when it was muddled and unintelligible. The lower register of the soundstage is not overly large and dispersed, but rather controlled and tight, giving the soundstage a clear rectangular image.
The most impressive thing was Dire Straits’ first self-titled album, “Dire Straits.” The bass became extremely focused. In my memory, the outline of the kick drum and bass has never been so clear, the imaging so prominent, and the positioning so unambiguous.
In the past, I thought that my room had problems with standing waves, causing the bass to be muddy and unclear. I tried many ways to solve it, but to no avail. I didn’t expect that Mr. Lin’s tuning guidance and the GNR 3.1 would easily solve the problem. It was like searching far and wide, only to find it effortlessly.
The picture shows the back panel of the NuPrime Evolution 1 power amplifier. You can see that it has a grounding terminal on the back, which is very convenient for grounding.
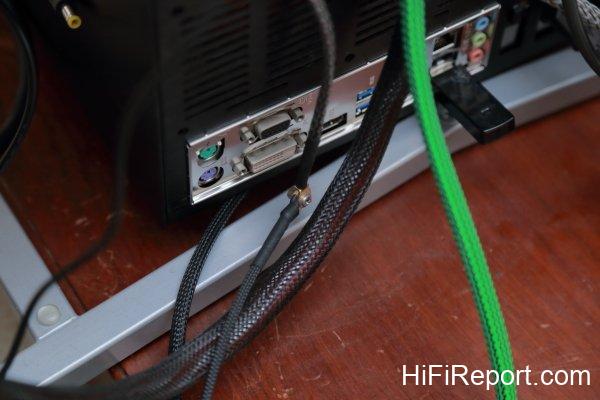
My computer is also connected to the GNR 3.1.
I fastened a grounding wire to the screw of the computer motherboard, and then ran this wire out of the case to connect to the grounding wire of the GNR 3.1.
The screw in the center of the picture is where the two wires are connected.
Embarking on the Path to Hi-End
Not only does it have excellent soundstage and bass performance, but the GNR 3.1 also allows audiophiles who love listening to timbre to enjoy it to the fullest.
For example, on the Artemis Quartet’s “the Piazzolla Project” album, the string timbre can be said to be a combination of realism, precision, sweetness, density, smoothness, and brightness. It’s both beautiful and realistic. This is because the GNR 3.1 releases very rich details, bringing out the original timbre of the instrument. It’s only natural that it sounds beautiful. Just think, these world-class musicians use excellent instruments, so as long as the original sound can be reproduced, it must be beautiful!
Through this personal experience, I have come to understand more clearly that most people’s audio systems probably still have a large unexplored virgin territory waiting for us to discover. We may not even know how much of our home audio system is currently being utilized. However, after Telos’s standardized tuning service and the extraordinary benefits of the GNR 3.1, I not only rediscovered my system and gained more from it, but I also raised my own sights, allowing me to see further.
Do you also want to understand your system more deeply and hear more? I believe the GNR 3.1 would be a good start, helping you embark on the path to Hi-End.
Specifications
* **Model:** Telos GNR 3.1
* **Type:** Active grounding box
* **Output Terminals:** 6 sets
* **Input Voltage:** 100-110V or 200-240V
* **Dimensions:** 390 x 240 x 60 mm (W x D x H)
* **Weight:** 7.5 kg